The Logic of Repair
Most garment failures are localised: a seam separates at a stress point, a knee wears thin, a moth finds a sleeve. The rest of the fabric remains structurally sound. Mending addresses the failure point without requiring the whole garment to be discarded — or replaced.
In Canada, the average garment is worn seven to ten times before disposal, according to figures published by Environment and Climate Change Canada on waste diversion. A mended garment that gets another thirty wears represents a significant reduction in the resources — water, dye, labour, transport — embedded in producing a replacement.
The techniques below require no specialist equipment for the most part: a needle, thread matched to the fabric colour, scissors, and for darning, a darning mushroom or a rounded form to hold the fabric taut.
Choosing Thread
Thread should match the fibre of the fabric being repaired wherever possible. Cotton thread on cotton or linen, wool thread for darning wool knits, silk thread on silk. The reason is practical: mismatched fibres age at different rates. Synthetic polyester thread on a natural fibre garment outlasts the surrounding fabric, creating stress along the stitching line as the garment moves.
Thread weight also matters. Embroidery thread divided into single or double strands offers more control for fine repairs than standard sewing thread. For visible mending — where the repair is intentionally left visible as a design element — contrasting thread in a harmonising colour is an option used by many makers.
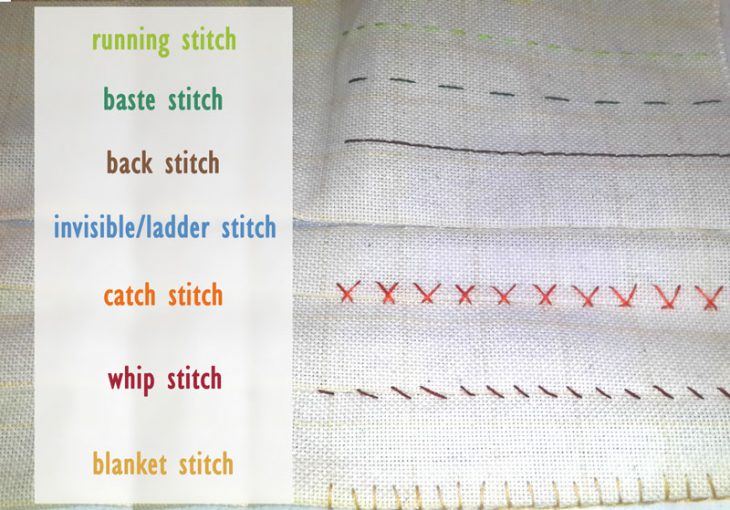
The Running Stitch and Backstitch
The running stitch is the foundational hand sewing stitch: the needle passes in and out of the fabric at regular intervals, creating a broken line of thread. It is used for basting (temporary holding), gathering fabric, and light seam repairs where stress is minimal.
The backstitch creates a continuous, unbroken line and is significantly stronger. After each forward stitch, the needle re-enters the fabric at the end of the previous stitch rather than advancing. The result resembles machine stitching on the right side of the fabric. Backstitch is appropriate for re-sewing separated seams, reattaching pockets, and anywhere mechanical stress will be applied.
Both stitches are worked with an even tension: tight enough to hold the fabric securely, loose enough not to pucker the surrounding material. Pulling thread too tightly causes gathering around the repair that does not lie flat.
Darning: Repairing Worn or Holed Knit Fabric
Darning rebuilds damaged fabric by weaving new thread across and through the existing structure. It is the correct repair for thin areas and small holes in knitted items — wool socks, elbows on jumpers, the heels of knitted slippers.
The working method: place the damaged area over a darning mushroom or a rounded form (a light bulb, a ball, or a smooth-sided jar works). Work parallel stitches horizontally across the hole, extending 5–8mm beyond the damage on all sides to anchor into sound fabric. Then turn the work 90 degrees and weave the thread under and over the horizontal threads, again extending beyond the original damage. The resulting grid reinforces the existing fabric and fills the hole.
Swiss darning (also called duplicate stitch) is used on stockinette knit specifically: new thread follows the path of existing stitches, effectively replacing worn yarn without changing the fabric's surface texture. It is invisible when done in matching yarn.

Patching: Reinforcing or Replacing Worn Areas
Patches are used when the damage covers too large an area for darning, or when the base fabric is too thin to anchor darning stitches reliably. The patch can be applied on the reverse side of the garment (an invisible repair) or the right side (a visible repair).
For an invisible reverse patch: cut a piece of matching or similar fabric slightly larger than the damaged area. Pin it to the wrong side of the garment, aligning grain lines if the fabric has a visible weave. Stitch around the patch perimeter using small running stitches or backstitch, then trim any fraying edges of the original damage.
Iron-on interfacing patches provide a quicker fix for small areas, but the adhesive bond weakens with repeated washing, particularly at higher temperatures. Hand-stitching through the interfacing after applying it extends the repair's durability significantly.
For jeans and heavy cotton trousers, denim patches cut from worn-out denim and applied with a sashiko running stitch pattern (a Japanese visible mending tradition) are both functional and widely used in Canada's repair culture community.
Reinforcing Stress Points Before Failure
Some areas of garments fail predictably: inner thighs of trousers, elbows of jackets, button attachment points, and the areas around pockets. Reinforcing these before failure appears is simpler than repairing them after.
At button attachment points, sewing through a small spare button on the inside of the fabric distributes the stress across a larger area of weave. This is standard tailoring practice and takes under five minutes per button. Elbow patches — either sewn fabric patches or leather patches — applied before the fabric thins are a permanent reinforcement that also changes the garment's appearance.
For trouser inner thighs, a light application of iron-on interfacing to the inside of the fabric before significant wear begins can double the useful life of the garment in that area.
Reattaching and Replacing Buttons and Fastenings
A lost button is one of the most common reasons a garment leaves rotation. Reattaching a button takes two to three minutes. If the original button is lost, replacement buttons from fabric stores — including Fabricville and Fabricland locations across Canada — are available individually. Button tins (collections of mismatched buttons) found at thrift stores provide a practical supply for varied colour matching.
When sewing a button, wrap the thread several times around the thread shank between button and fabric before knotting off. This shank allows the button to pass through the buttonhole without stressing the attachment thread directly.
Zip replacement requires more effort: the zip tape is sewn into a seam, and replacing it means opening the seam, removing the old zip, and sewing in the new one. For trouser flies and jacket fronts, this is a task most alterations shops in Canada complete within one or two business days at reasonable cost, making it practical even without sewing experience.
Caring for Repairs
A mended garment should be washed according to the base fabric's requirements, not the patch or thread material. If a denim patch is applied to a linen shirt, the linen care guidelines take precedence — not the denim's tolerance for hot washing. Patches on fine fabrics benefit from being washed inside-out to reduce abrasion against the repair edge.
Repairs extend garment life most effectively when applied early. A small thin area reinforced before it holes will last longer than the same area patched after a hole opens. Regular inspection of high-stress areas — particularly after the first 20 to 30 wears — catches problems at the most repairable stage.
Last updated: May 14, 2026. Lead image: Hand Sewing Stitches, Hellosewing, CC BY-SA 4.0, via Wikimedia Commons. Darning illustration: S.F.A. Caulfeild & B.C. Saward, 1885, public domain, via Wikimedia Commons.